
Is the fear of a long session more daunting than the actual design you’ve spent months dreaming about? For many enthusiasts, the primary hurdle isn't the commitment to the art, but the anxiety of hitting a physical wall before the work is finished. It’s completely natural to feel a sense of hesitation when facing the unknown sensation of a needle. You want a piece that lasts a lifetime, but you also want to ensure the process feels manageable, professional, and controlled.
We believe that pain is a collaborative variable, and being prepared is the first step toward a successful appointment. To help you move forward with clarity, we’ve developed this expert-verified tattoo pain chart by body part. This guide is designed to replace uncertainty with professional insight, mapping out discomfort levels across the body based on decades of technical experience. You’ll learn how to distinguish between different types of sensations, discover which placements require more mental grit, and find actionable tips to settle your nerves. By the end of this guide, you’ll have the confidence to approach your next consultation as a prepared partner in the creative process.
Key Takeaways
- Understand the biological relationship between nerve density and skin layers to better manage your body's natural response to the tattooing process.
- Consult our expert-verified tattoo pain chart by body part to identify low-sensitivity "Green Zones" and prepare for more challenging placements.
- Learn why external factors like session duration and the specific needle technique can influence your discomfort more than the location alone.
- Implement a professional preparation protocol involving hydration and high-protein meals to maximize your physical stamina during the appointment.
- Discover how the technical precision of a master artisan and a focused studio environment can significantly reduce skin trauma and session anxiety.
Understanding the Science of Sensation: Why Tattoos Hurt
The physical sensation of getting a tattoo is often described as a steady scratch or a deep vibration. To understand why these sensations vary so significantly, we must look at the biological tattooing process and skin anatomy. When a needle enters the skin, it must bypass the surface layer to deposit pigment into the dermis. This layer is thick enough to hold ink permanently but also houses a complex network of nerves and blood vessels.
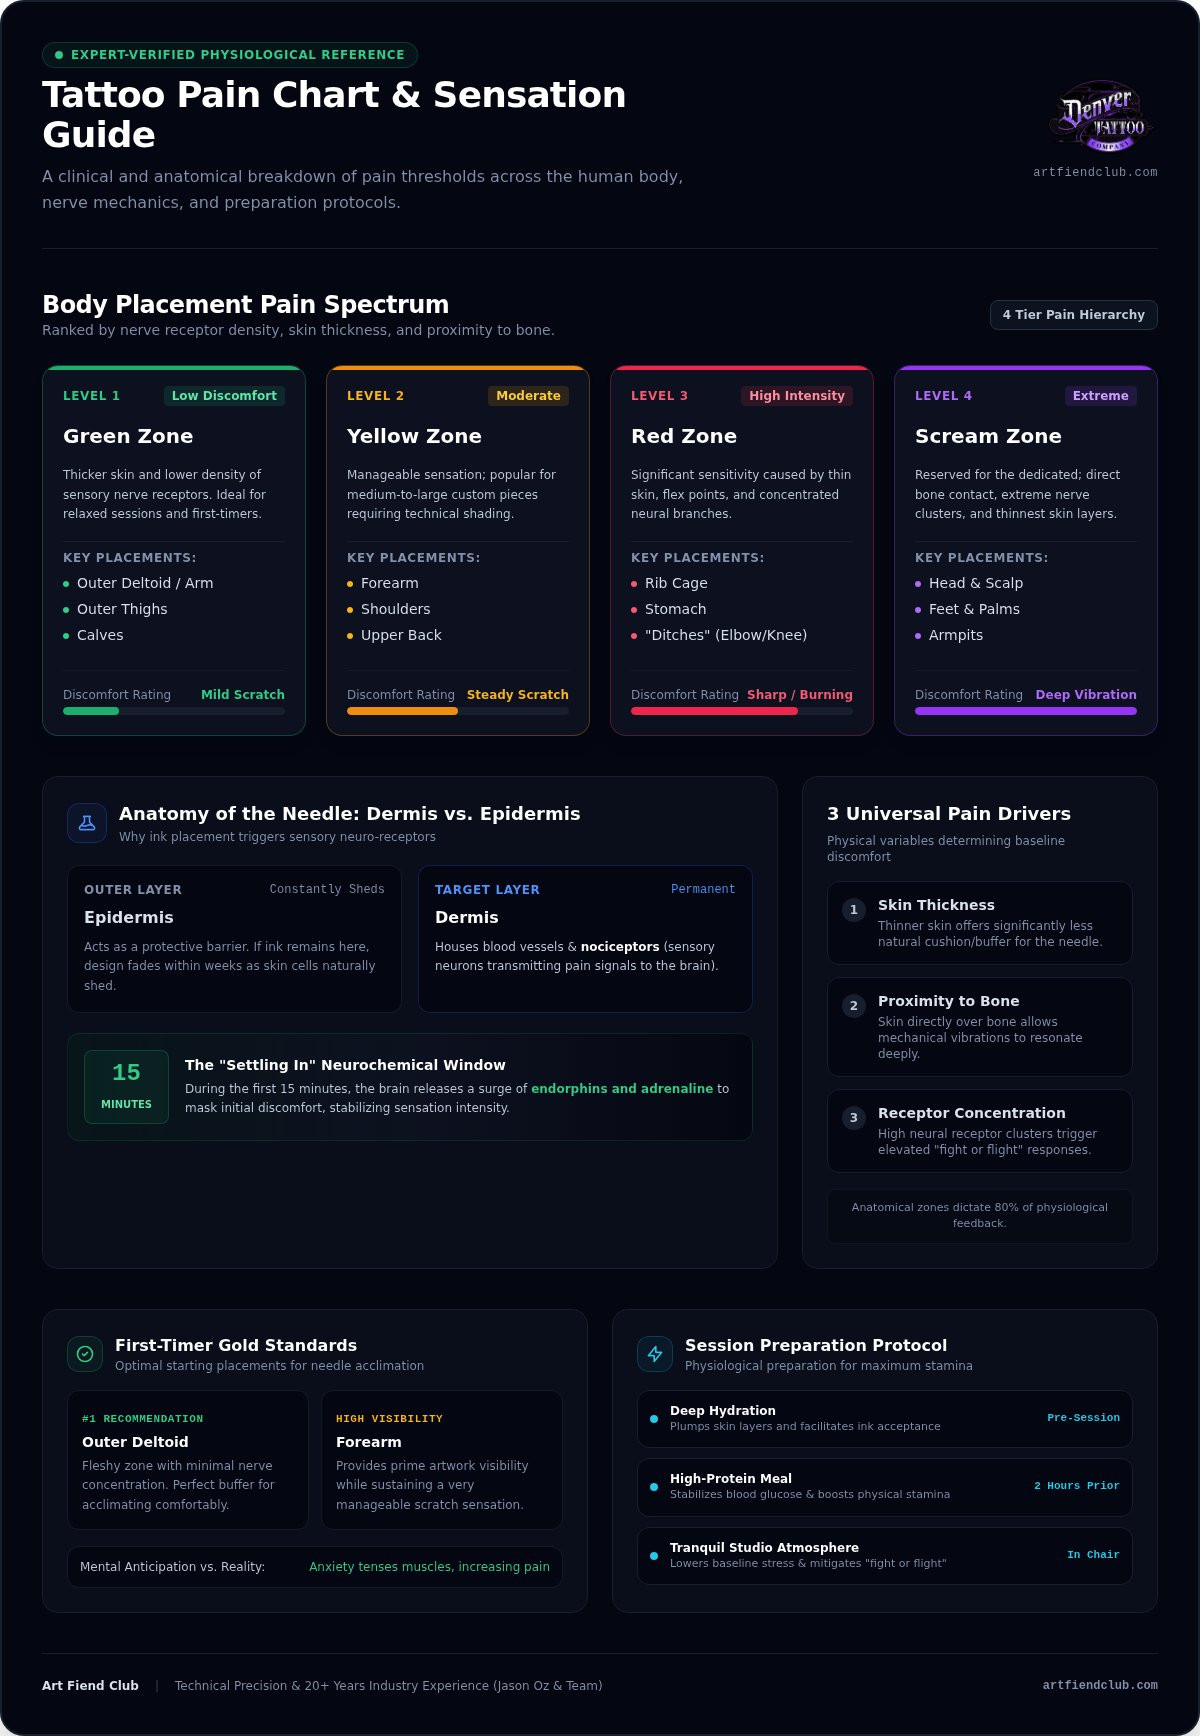
Your body views this process as a controlled trauma. During the first 15 minutes of a session, your brain releases a surge of endorphins and adrenaline to mask the initial discomfort. This natural chemical cocktail is why many clients report a "settling in" period where the intensity seems to level off. However, your experience largely depends on nerve density. Areas with a high concentration of sensory receptors trigger a stronger "fight or flight" response. This is why a tattoo pain chart by body part typically ranks the torso and joints as more intense than the outer limbs. Certain factors create a universal baseline for high discomfort:
- Skin Thickness: Thinner skin provides less of a buffer for the needle.
- Proximity to Bone: Areas where skin sits directly over bone allow vibrations to resonate more deeply.
- Receptor Concentration: High clusters of nerves in areas like the inner arm or armpit increase sensitivity.
The Dermis vs. Epidermis: Where the Magic Happens
The epidermis acts as a protective barrier that constantly sheds cells. If ink only reached this surface layer, your design would fade within weeks. For a piece to remain vivid for decades, the needle must reach the dermis, which is the stable middle layer of skin. Your immune system immediately reacts by sending white blood cells to the area, though the ink particles are too large for them to fully remove. Nociceptors are the specialized sensory neurons that send pain signals to your brain when they detect mechanical pressure or skin penetration.
Mental vs. Physical Pain: The Psychology of the Chair
Physical discomfort is often amplified by mental anticipation. When you're anxious, your muscles tense and your heart rate climbs, which can make even a "Green Zone" area on a tattoo pain chart by body part feel overwhelming. A master artisan understands that the environment is just as important as the technique. At Art Fiend Club, we prioritize a tranquil, focused atmosphere to help lower your baseline stress. Jason Oz and our team use their 20 plus years of industry experience to guide you through the session, ensuring you feel like a collaborative partner rather than just a canvas. This steady hand and professional presence help transform a potentially stressful event into a focused creative journey.
The Comprehensive Tattoo Pain Chart: Ranking Every Major Body Part
While every individual has a unique threshold, anatomical patterns allow us to create a reliable tattoo pain chart by body part. These rankings are based on years of observing client reactions and the physiological reality of nerve endings and skin layers across different zones. By categorizing the body into zones, we can help you set realistic expectations for your session.
- Green Zone (Low Pain): These areas feature thicker skin and fewer nerve endings. The outer arm, outer thighs, and calves are ideal for those who prefer a more relaxed experience.
- Yellow Zone (Moderate Pain): Shoulders, the upper back, and the forearm offer a manageable "scratchy" sensation. These are popular for medium-sized custom pieces.
- Red Zone (High Pain): The ribs, stomach, and the "ditches" (inside of the elbow and knee) are significantly more intense due to thin skin and high nerve density.
- Scream Zone (Extreme Pain): Areas like the head, feet, palms, and armpits are reserved for the dedicated, as they trigger the body's highest sensitivity.
Least Painful Placements for First-Timers
For a first session, the outer deltoid remains the gold standard. It’s a fleshy area with minimal nerve concentration, allowing you to acclimate to the needle without feeling overwhelmed. The forearm is another excellent choice; it provides high visibility for your new art while maintaining a very manageable sensation. Calves are also surprisingly easy for most, making them a popular choice for larger initial pieces. If you're feeling unsure about your first placement, a tattoo consultation can help align your design goals with your comfort level.
The Notorious "Hot Spots" Explained
Certain areas are infamous for a reason. Rib and sternum tattoos involve the needle working directly over bone, which creates a deep vibration that can be difficult to ignore. The "ditches" behind the knee or inside the elbow are sensitive because of high joint mobility and very thin skin. Similarly, the feet and ankles lack a fat buffer, placing the work directly against a dense network of nerves. These areas often require more frequent breaks and a steady, experienced hand to ensure the work remains precise despite the client's natural reflex to twitch. Understanding these zones on a tattoo pain chart by body part helps you prepare mentally for the challenge of a high-sensitivity placement.
Factors Beyond Location: What Actually Dictates Your Pain Threshold
Location is only one piece of the puzzle. While a tattoo pain chart by body part provides a useful baseline, your personal experience is often dictated by the clock. Most clients encounter what we call the 'three-hour wall.' This is the point where the body’s natural supply of adrenaline and endorphins begins to deplete. Once this chemical buffer fades, the sensation becomes more difficult to manage. This is why we often suggest breaking larger custom designs into multiple sessions to keep the experience manageable and ensure the skin remains receptive.
The type of work being performed also shifts the sensation. Linework uses tight needle groupings that feel like a sharp, focused scratch on the skin. In contrast, shading and color packing use broader needle clusters. These create a vibrating, warm sensation. Because shading often requires multiple passes over the same area to achieve smooth gradients or saturated color, it can feel more intense than the initial outline as the session progresses.
Individual physiology and your daily health play a critical role. Your skin histology and nerve distribution are unique, and they dictate where you land on a tattoo pain chart by body part during a live session. Arriving for your appointment after a poor night’s sleep or without a proper meal lowers your tolerance. When you are tired or hungry, your nervous system is more reactive, making every pass of the needle feel more pronounced than it would on a well-rested day.
The Colorado Factor: Altitude and Skin Sensitivity
Living in the Mile High City introduces specific environmental variables. Denver’s dry, thin air frequently leads to dehydrated skin, which is less elastic and more sensitive to the tattooing process. At Denver Tattoo Company, we prioritize long term tattoo care Colorado to ensure your skin remains a healthy, resilient canvas. Drinking significant amounts of water in the days leading up to your session helps keep the dermis supple, which reduces unnecessary irritation and aids in a smoother application.
The Complexity of the Design
A simple fine line piece might be finished before your body even registers the discomfort, but intricate realism requires a different level of endurance. Custom realism involves layering and "packing" pigment to create depth, meaning the artist will return to the same area several times. The size of the needle grouping also changes how you perceive pressure. While larger needles distribute force over a wider area, smaller groupings feel more piercing. Understanding these nuances helps you prepare for the specific rhythm and physical demands of your chosen design.
Professional Preparation: How to Manage Discomfort and Ensure a Smooth Session
Preparation is the bridge between anxiety and a successful session. While a tattoo pain chart by body part helps you select a location, your physical state determines how your nervous system handles the needle. A body that is well-rested and properly fueled is far more resilient than one under stress. We recommend a strict "Tattoo Eve" protocol: secure at least eight hours of sleep, double your water intake, and completely avoid alcohol for 24 hours. Alcohol thins the blood, which can lead to excess swelling and make the ink more difficult to pack, ultimately prolonging your time in the chair.
On the day of your appointment, eat a substantial meal rich in proteins and complex carbohydrates about two hours before you arrive. This stabilizes your blood sugar and prevents the vasovagal response, which is the scientific term for feeling lightheaded or fainting. You should also prepare a personal comfort kit to bring to the studio, including:
- A refillable water bottle to maintain hydration in our dry climate.
- High-protein snacks like nuts, cheese, or a protein bar for longer sessions.
- Headphones and a curated playlist or podcast to act as a sensory gate.
- Comfortable, loose-fitting clothing that allows easy access to the tattoo site.
Open communication is your best tool for pain management. If you feel dizzy, nauseous, or simply need a five-minute stretch, tell your artist immediately. We prioritize your safety and the integrity of the work over speed.
The Truth About Numbing Creams
Topical anesthetics can be helpful for high-sensitivity areas, but they must be used with caution. These products typically use lidocaine to temporarily dull the surface nerves. However, some creams can change the texture of the skin, making it feel "rubbery" or difficult for the artist to work with. Maintaining safe tattoo studio Denver standards means only using verified, high-quality products that won't compromise the healing process. You should also be aware of the "rebound effect," where the pain can feel more intense once the numbing agent wears off mid-session. Always discuss the use of any topical products during your initial consultation.
Breathing and Distraction Techniques
Control your breath to control your pain. We often guide clients through "box breathing"-inhaling for four seconds, holding for four, exhaling for four, and holding again. This simple rhythmic pattern regulates your heart rate and prevents the "fight or flight" response from taking over during intense linework. Jason Oz and our dedicated team are experienced in reading client body language, providing a steady hand and a calm presence to help you stay focused. If you're ready to discuss your design and placement, you can book a tattoo consultation to start the process with a professional plan.
Collaborative Comfort: Why Your Artist Choice Matters for Pain Management
Technical skill isn't just about the visual result; it's about how your skin is treated during the process. A master artisan uses precise needle depth and steady pressure to ensure the ink is deposited correctly without causing unnecessary skin trauma. This technical discipline is what separates a manageable session from an exhausting one. While a tattoo pain chart by body part provides the map, your artist is the guide who determines the difficulty of the terrain. A steady, experienced hand can make even sensitive areas feel significantly more tolerable.
Choosing a specialized environment is equally vital for your comfort. A tattoo only studio Denver offers a level of focus you won't find in multi-service shops. By dedicating ourselves exclusively to the craft of ink, we maintain a clean, quiet, and intentional atmosphere that helps you stay grounded. This specialization allows us to tailor custom designs to your specific anatomy, ensuring the placement works with your body's natural contours and your personal sensitivity levels. When you're in a focused environment, your mind can settle, which lowers your overall perception of discomfort.
Experience and Integrity at Denver Tattoo Company
At Denver Tattoo Company, we view every piece as a collaborative commitment to excellence. Jason Oz brings over 20 years of industry experience to the table, providing the steady hand needed for everything from intricate fine line work to expansive custom realism. Our Englewood studio is designed as a sanctuary for the craft, prioritizing medical-grade hygiene and client focus. We utilize single-use sterilized equipment as a non-negotiable standard for every client, giving you the professional peace of mind to relax and engage with the creative process. This foundation of safety and veteran expertise ensures that even the more challenging areas on a tattoo pain chart by body part are approached with the necessary care and technical precision.
Booking Your Consultation
The best way to mitigate fear is through honest information. During your initial meeting, we encourage you to be transparent about your pain concerns and any past experiences you've had in the chair. This dialogue allows us to adjust the session plan to your needs, perhaps suggesting a subtle change in placement or breaking a large, complex design into shorter, more manageable segments. We're here to act as your creative partner and a steady authority, ensuring your journey from the first sketch to the final heal is as smooth as possible. Ready to start your custom journey? Visit Denver Tattoo Company today.
Moving Forward with Confidence and Clarity
You now have the professional map needed to navigate the physical realities of your next piece. While the tattoo pain chart by body part provides a scientific baseline for sensitivity, remember that your personal preparation and the precision of your artist are the true keys to a smooth session. By prioritizing hydration, rest, and a collaborative approach, you transform a daunting process into a controlled and rewarding creative journey.
Choosing a dedicated environment makes a world of difference. At Denver Tattoo Company, Englewood’s premier custom tattoo studio, we combine strict sterilization and single-use standards with the technical expertise of Jason Oz. With over 20 years of industry experience, our team provides the steady hand you need to feel secure throughout the entire process. Don't let the fear of the unknown hold you back from the art you've always wanted. Book Your Custom Tattoo Consultation in Denver today to discuss your vision and placement with a master artisan. We're ready to help you bring your design to life with the care and integrity it deserves.
Frequently Asked Questions
Where is the least painful place to get a tattoo?
The least painful areas are typically those with thicker skin and a higher fat content, such as the outer arm, outer thigh, or the calves. These locations often rank as the "Green Zone" on a tattoo pain chart by body part because they have fewer nerve endings. At our Englewood studio, we often recommend these placements for first-time clients who want a manageable and professional introduction to the process.
Is it true that rib tattoos are the most painful?
Rib tattoos are widely considered one of the most intense experiences due to the skin's thinness and the needle's proximity to the bone. The lack of a muscle buffer means you'll feel the machine's vibrations resonate throughout your chest. While they are challenging, our team in Denver uses specific breathing techniques to help you stay calm and focused during these high-sensitivity, professional sessions.
How long does the "endorphin rush" last during a tattoo session?
Most clients experience a natural surge of endorphins and adrenaline within the first 15 minutes of a session. This chemical response helps mask the initial discomfort, making the sensation feel more like a dull pressure. However, this buffer usually begins to fade after two to three hours. It's often the best time to take a short, professional break at our Englewood shop to reset your stamina.
Does getting a tattoo feel like a bee sting or a scratch?
The sensation is most frequently described as a hot, steady scratch or a deep vibration rather than a sharp bee sting. Linework feels more like a focused scratch on the skin surface, while shading tends to feel like a warm, rhythmic vibration. Your personal experience will vary based on the specific placement you've chosen on the tattoo pain chart by body part during your consultation.
Can I take ibuprofen or aspirin before my tattoo appointment?
We strongly advise against taking aspirin or ibuprofen before your appointment because these medications act as blood thinners. Increased bleeding can make it difficult for the artist to see the design and can interfere with how the ink saturates the dermis. If you need pain management, please discuss safe alternatives with us during your initial consultation at our Denver area studio to ensure a safe session.
Why do I feel shaky or cold after a long tattoo session?
Feeling shaky or cold after a session is a common physical response known as an adrenaline dump. Your body has been in a heightened state of stress, and as the adrenaline leaves your system, your blood sugar may drop. We recommend eating a high-protein meal before arriving at our Englewood studio and keeping a sugary snack or juice on hand to help stabilize your system immediately afterward.
Does the size of the tattoo needle affect how much it hurts?
Yes, needle groupings change the perception of pain. Fine line work uses smaller, tighter groupings that can feel sharper and more piercing. Conversely, larger groupings used for shading or color packing distribute the pressure over a wider area, creating a sensation that feels more like a heavy vibration. Our artists in Denver select the most efficient tools to minimize skin trauma while achieving the precision required for your work.
What should I do if I feel like I am going to faint?
If you feel lightheaded or nauseous, you must inform your artist immediately. Don't worry about tapping out or being embarrassed; your safety is our first priority. We will stop the session, have you lie down, and provide water or a snack to help your blood sugar recover. Taking a brief break is a normal part of the collaborative process in our Englewood shop to ensure your comfort.


